Neovim PimpUp - 2025 Edition


Every year, I use my Christmas/New year holiday period to make improvements to my Neovim configuration. I fix bugs, remove deprecated packages, pick a new colorscheme for the year and, best of all, find new and exciting packages to add to my Neovim configuration.
I do this "pimp up" session seldomly by choice. By giving time between my pimp up sessions, I have more Neovim packages to explore. When I do this once a year, I feel like I am exploring a shopping mall of new and exciting Neovim tools. It's like Christmas shopping for me.
There is also the added benefit of letting other Neovim users tryout the tools before I install it. Bugs will get reported and more resources will be shared online for me to refer to when I get stuck trying to make a package work.
Therefore, I only make small fixes and additions to my config throughout the year, and do a big pimp-up during the holiday period. Today I will share with you the changes I made to my Neovim config for 2025.
File Navigation - nvim-tree
I've been a user of nvim-tree for a few years. I have always been a file-tree user - I like to keep my file-tree open to the left at all times. I also liked how nvim-tree supported file operations (cut, copy, paste, rename etc). It saves me from switching to the terminal to perform basic file operations.
However, I had issues with nvim-tree's file operation keys as they were different to vim mappings. For example, if you wanted to move multiple files in nvim-tree, you will have to first mark all the files with m and then move them with bmv. I instead wanted to use vim mappings so that there are less key shortcuts that I have to remember.
I first found oil.nvim, which is a file explorer that lets you edit file systems in a Neovim buffer. However, it is not a file-tree, which is what I want. Oil can only display one folder at once - it is a "file explorer" rather than a "file tree".
I then tried neo-tree.nvim, which is another file-tree package on Neovim. I think neo-tree looks better than nvim-tree, thanks to the icons and colors it uses compared to nvim-tree. Also, I think the "Size" "Type" "Last Modified" columns that get displayed when neo-tree is in full-screen mode is a nice addition.

Most of all, I find the keyboard shortcuts to be more intuitive than nvim-tree. I can visual select bulk files which is a big win. It is not a perfect neovim buffer - you can't use text objects to rename files, or bulk-rename using block select. I will keep looking for new File-tree packages in the next year.
Color Scheme - Catppuccin (Mocha)
I'm a simple man when it comes for colorschemes. If its dark and it looks good, I'm happy.
For the last year, I have been using the rebelot/kanagawa colorscheme. Its dark and it looks good! It also tickles my Japanese heritage itch. I loved it. However, colorschemes get mundane after looking at it for a whole year, so it was time to switch things up.
I first tried the folke/tokyonight colorschemes - it was nice, but it was too blue for my liking.
Then I found catppuccin and fell in love. It works, its dark, it looks good. I picked the Mocha version because that is my go to drink.
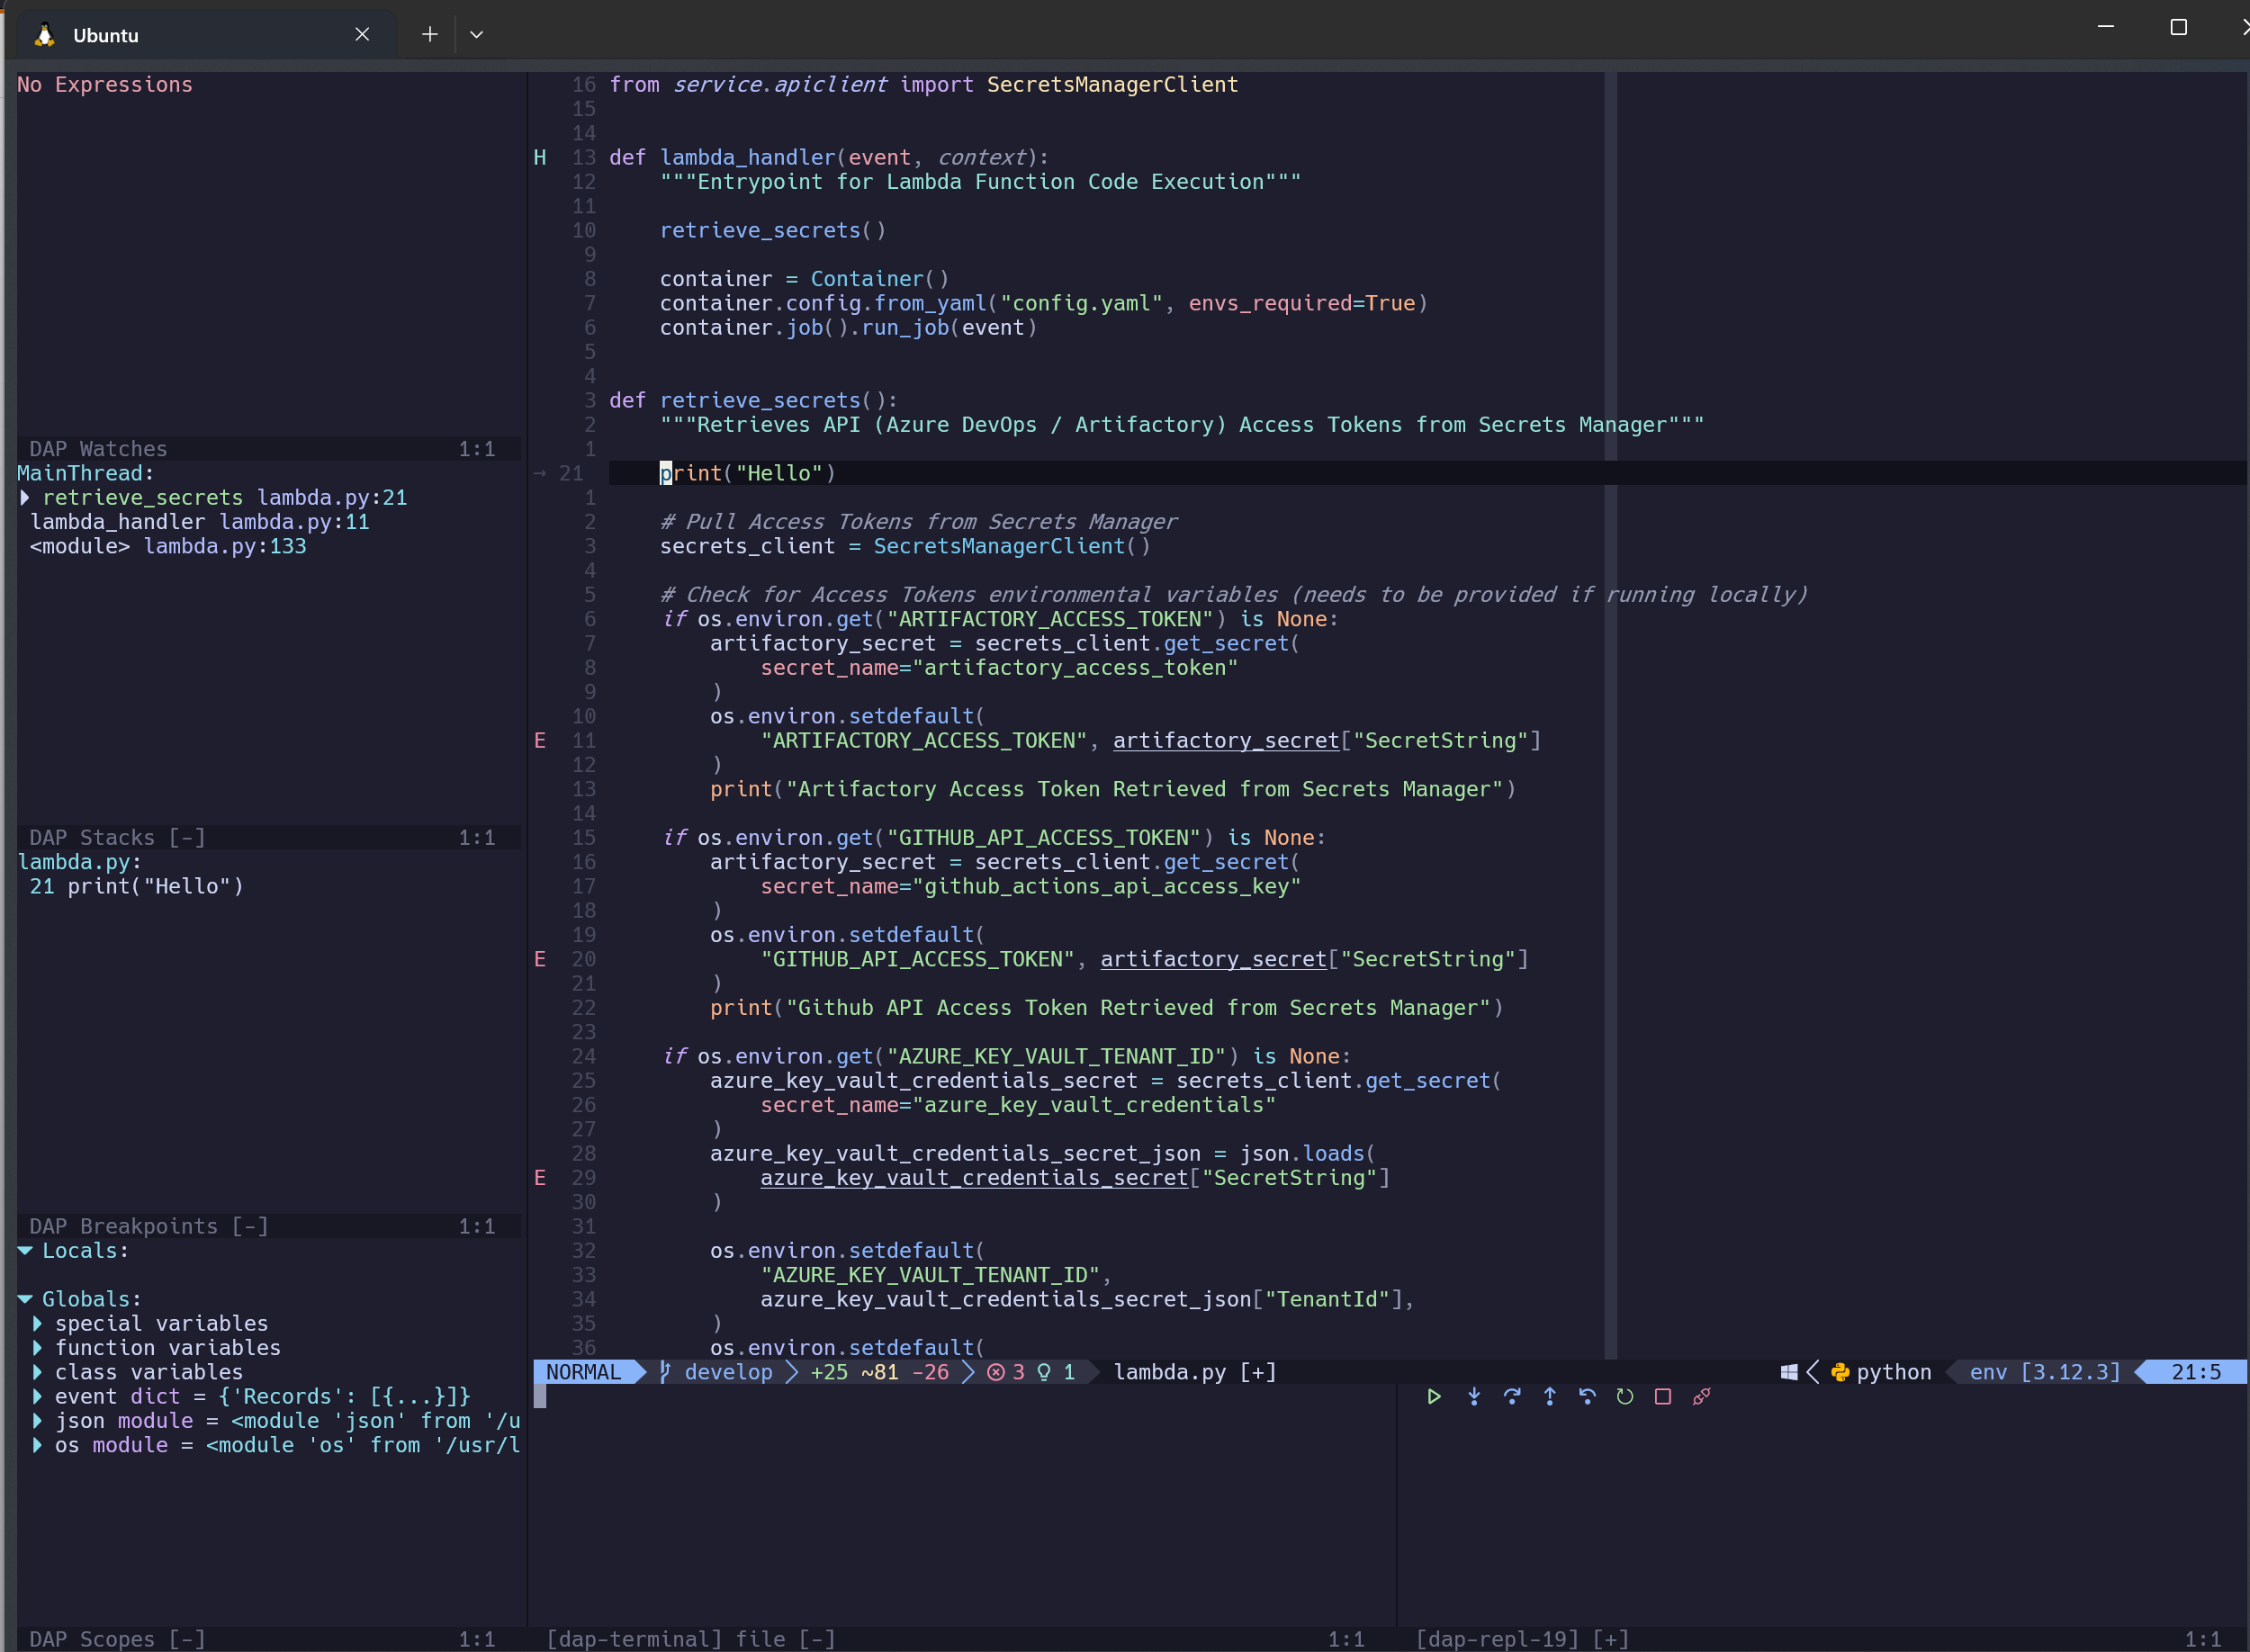
Debugger - nvim-dap and its friends
A full fledged code debugger was not something that I had tried setting up on Neovim before. I thought that debuggers don't belong on a text editor like Neovim. Besides, I rarely use the debugger - I debug things by printing a shit ton of logs until things made sense.
The only occasion that I would use a debugger is if I am pair programming and my partner asks to start a debugger session. When that happens, I would resort to an IDE like VSCode. And by that I mean I open my project on VSCode, act like I know what I am doing, run the debugger, see the IDE instantly complain about how my launch.json is improperly configured and then I awkwardly smile at the screen while I sit there not knowing what to do next.
Anyways, I am now working on some large Python project that warrants me of using a Python debugger. I really wanted a setup that works on Neovim, so searched the web in the hopes of finding some heavenly packages from the Neovim gods.
Lo and behold, my fully fledged debugging environment for 2025:
# Debugging
{
  "mfussenegger/nvim-dap",
  dependencies = {
    "rcarriga/nvim-dap-ui",
    "theHamsta/nvim-dap-virtual-text",
    "nvim-neotest/nvim-nio",
  }
},
"mfussenegger/nvim-dap-python",
# Config settings
-- Define keymaps
local dap = require("dap")
local ui = require("dapui")

vim.keymap.set("n", "<leader>db", dap.toggle_breakpoint, { desc = "Add breakpoint" })
vim.keymap.set("n", "<space>de", function() ui.eval(nil, { enter = true }) end, { desc = "Evaluate value" })


vim.keymap.set("n", "<F1>", dap.continue, { desc = "DAP Continue" })
vim.keymap.set("n", "<F2>", dap.step_into, { desc = "DAP Step-Into" })
vim.keymap.set("n", "<F3>", dap.step_over, { desc = "DAP Step-Over" })
vim.keymap.set("n", "<F4>", dap.step_out, { desc = "DAP Step-Out" })
vim.keymap.set("n", "<F5>", dap.step_back, { desc = "DAP Step-Back" })
vim.keymap.set("n", "<F6>", dap.terminate, { desc = "DAP Stop" })
vim.keymap.set("n", "<F12>", dap.restart, { desc = "DAP Restart" })

dap.listeners.before.attach.dapui_config = function()
  ui.open()
end
dap.listeners.before.launch.dapui_config = function()
  ui.open()
end
dap.listeners.before.event_terminated.dapui_config = function()
  ui.close()
end
dap.listeners.before.event_exited.dapui_config = function()
  ui.close()
end

require("dapui").setup()
# Use the virtual environment with debugpy installed
require("dap-python").setup("~/.virtualenvs/debugpy/bin/python")
The setup is pretty simple, really. With just this code, I got a debugging experience that is the same as that from VSCode (DAP, or Debugging Adapter Protocol, is also used in VSCode afterall). Honestly it was a lot less hassle to setup than I originally anticipated.
LSP
Not much has changed in the LSP department this year. The only thing I did was I tried removing a lot of code from my config.
Setting up LSP on Neovim has always been black magic to me. I copy some code from the internet, paste it to my config, hope it works, it doesn't, I change something, reload neovim, hope it works... until one point it does work and I don't touch it until the next time.
This year, I followed VonHeikemen/lsp-zero.nvim's getting started guide to get a fresh, clean LSP setup.
Status Line
This year, I decided to pimp up my Neovim status-line with nvim-lualine/lualine.nvim. I haven't used a status line package before, and when I added it to my environment I was surprised how it can lift the look of the editor. Its just one line at the bottom of the screen, but it holds so much info.
For now I am using the default config - I might tweak the settings if I want more info on the status line.
folke
This year, the name "folke" was mentioned everywhere in the Neovim scene. He is the author of the Neovim distribution LazyVim, and he also builds a lot of Neovim packages as well.
I actually tried the LazyVim distribution this year, but I lost all my existing configuration and I didn't want to re-add everything. Instead, I decided to keep my configuration as-is and add the folke packages instead. Here are the ones I tried:
folke/which-key.nvim
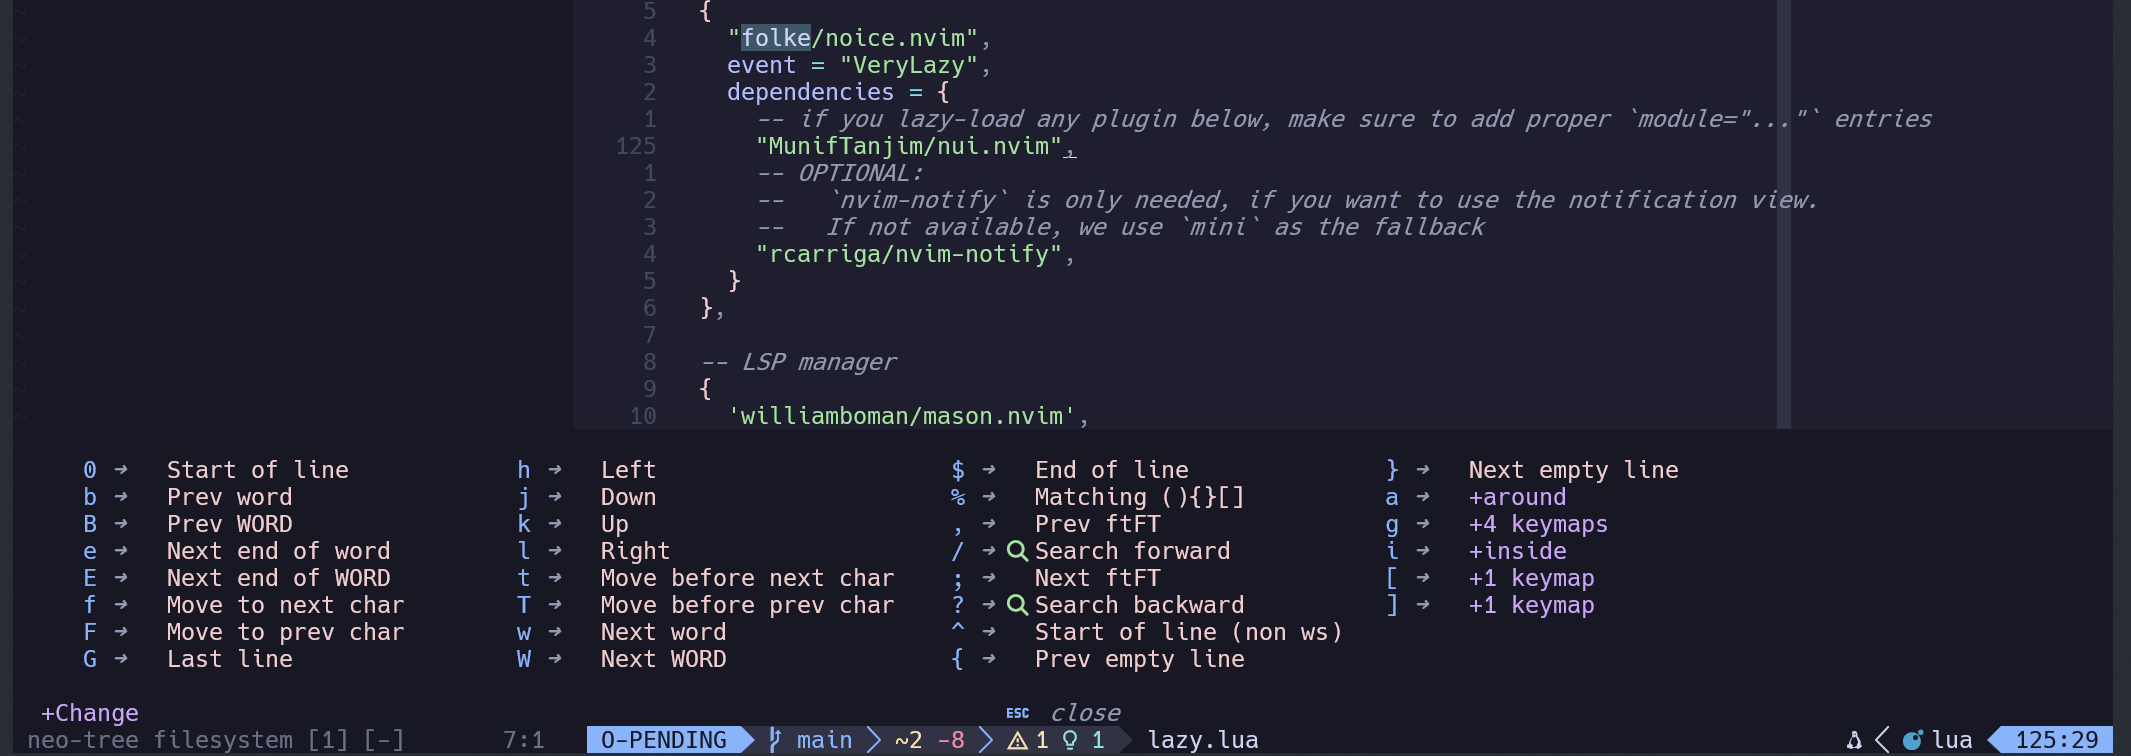
The folke/which-key.nvim package adds a shortcut reminder feature on your Neovim editor. When you type in a partial action (such as c, d or even your leader key) a window pops-up with all the different keys you can press next. It makes the vim experience beginner friendly. I frequently forget the shortcuts that I add, so this is a life-saver.
My config for which-key is pretty basic as well. I played around with the delay so it pops up faster.
require("which-key").setup {
  ---@type false | "classic" | "modern" | "helix"
  preset = "classic",

  -- Delay before showing the popup. Can be a number or a function that returns a number.
  ---@type number | fun(ctx: { keys: string, mode: string, plugin?: string }):number
  delay = 100,

  plugins = {
    presets = {
      operators = true,
      motions = true,
      text_objects = true,
      windows = true,
      nav = true,
      z = true,
      g = true
    },
    registers = true
  }
}
folke/noice.nvim
folke/noice.nvim is a plugin that displays Neovim command line and system messages on a popup window. The command line will be shown in a popup window in the center of the screen. Your messages are displayed on a floating window on the top right corner of the screen, much like a notification on a modern app.
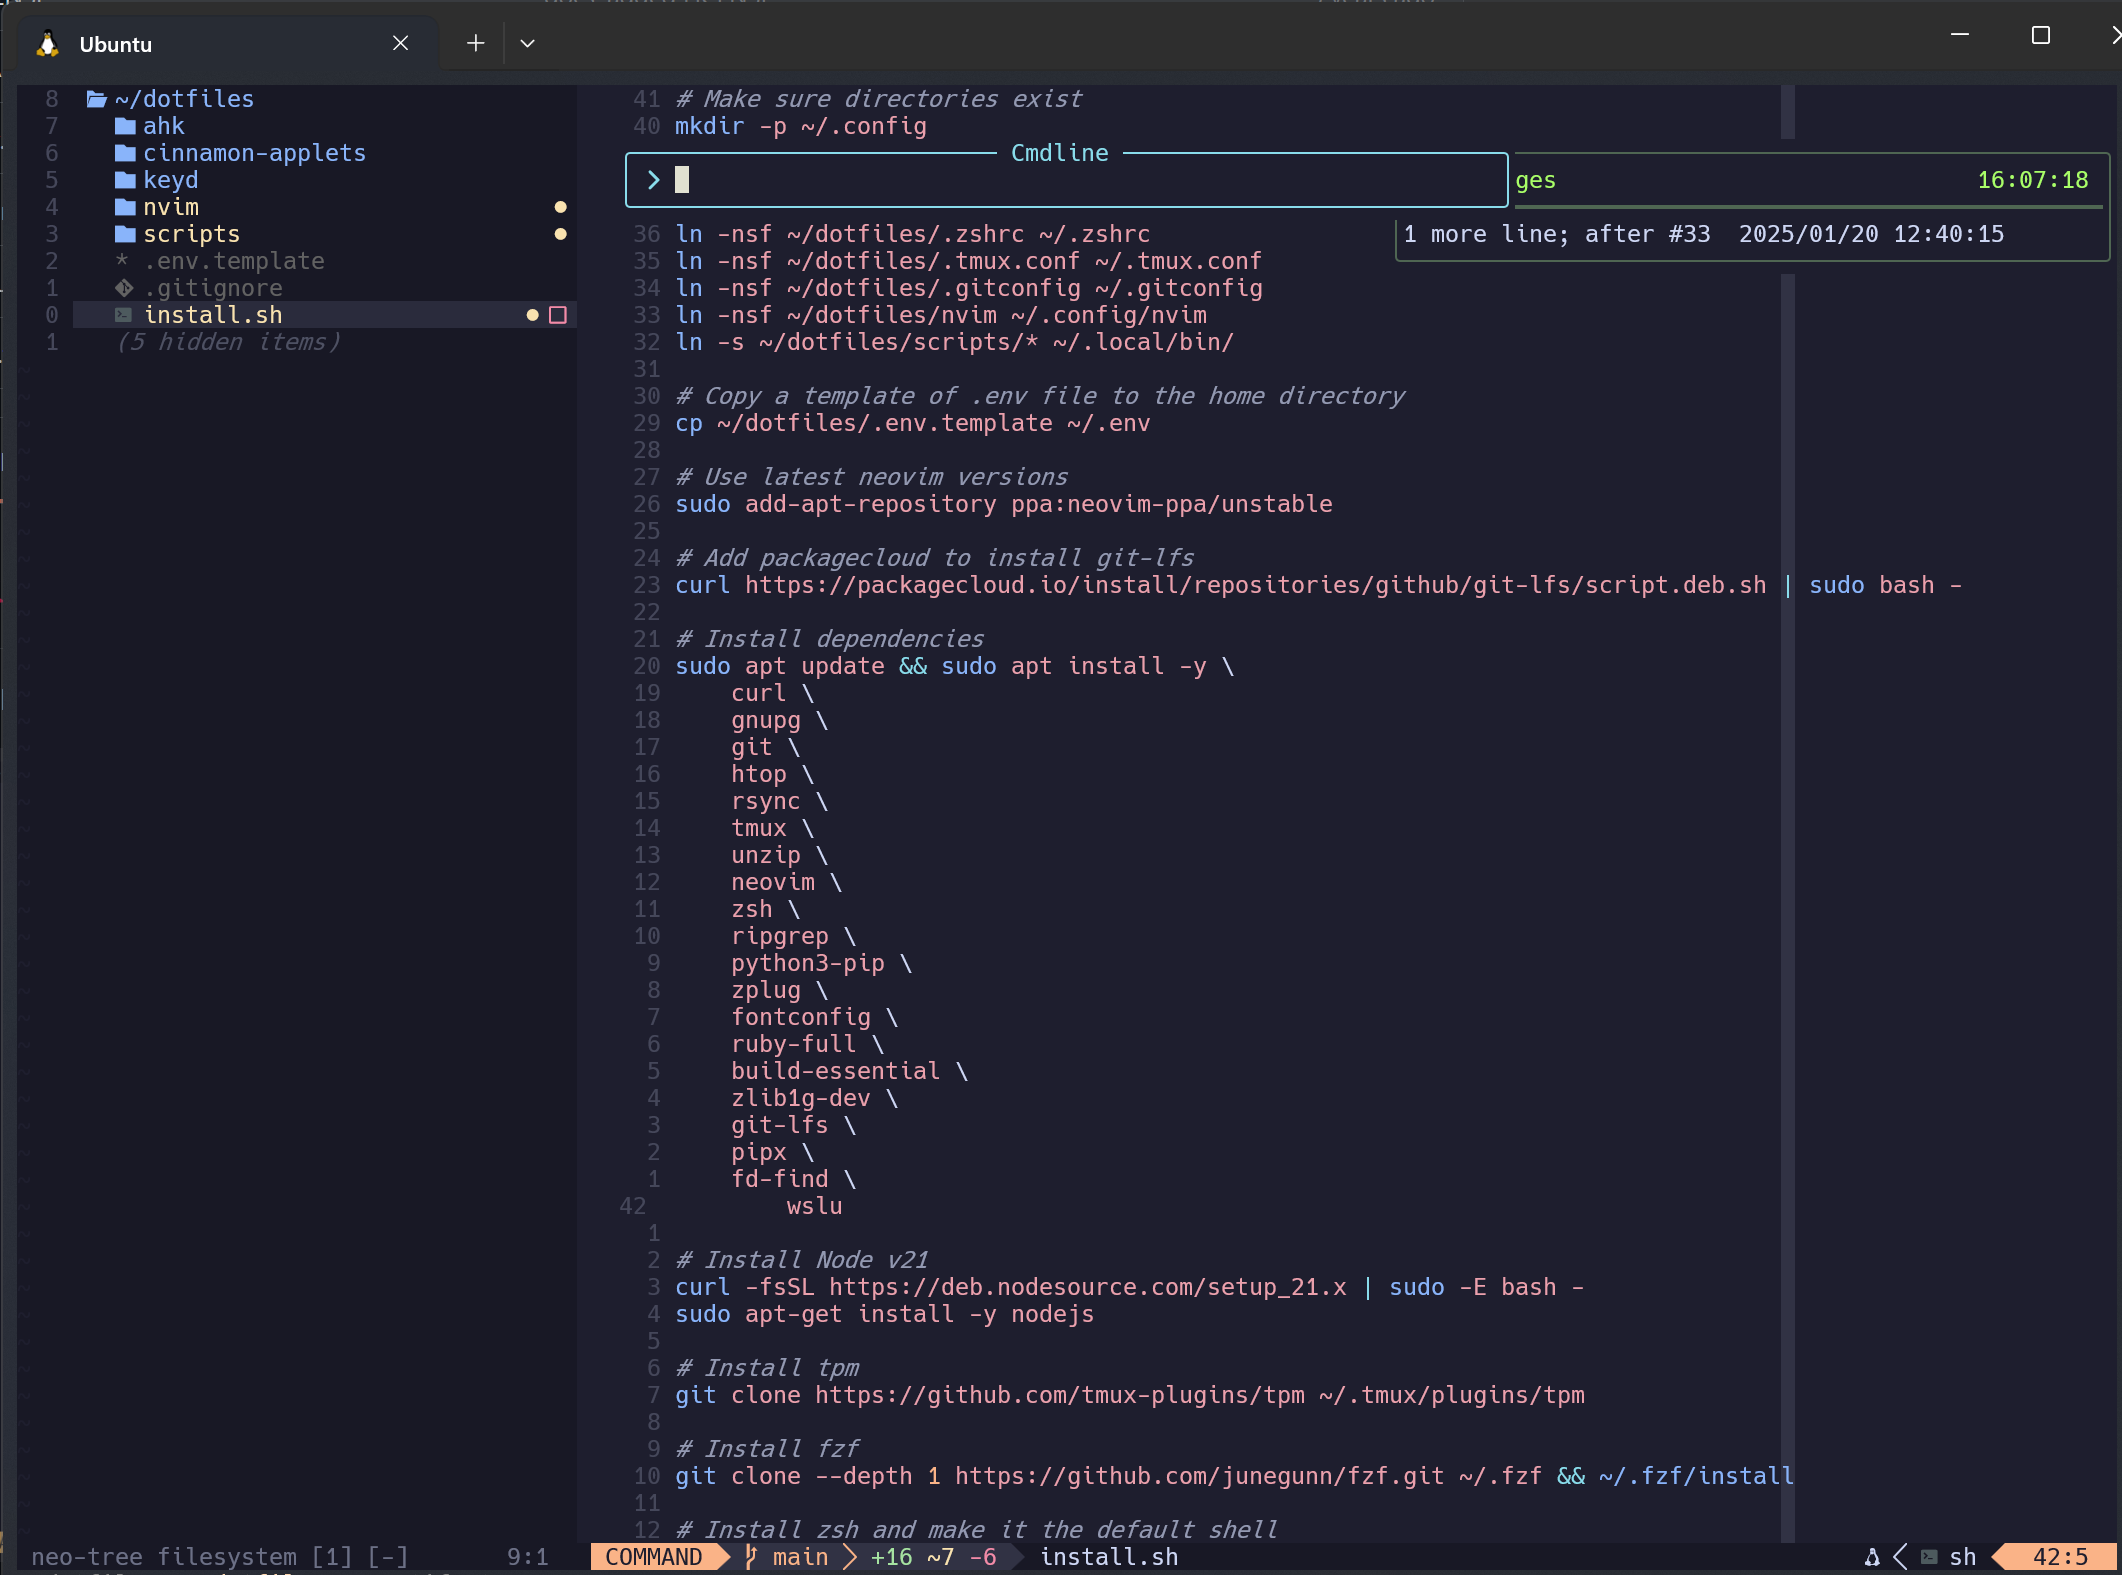
This also makes your Neovim editor look more modern. Its honestly amazing how folke can just come up with these PlugIns that can dramatically change how your Neovim editor feels. I think he is a great factor in the increase of popularity of the Neovim editor.
I have made some changes to the default configuration.
- I didn't like the search bar to be in the middle of the screen, so I reverted to the classic bottom cmdline for serach
- I filtered out a lot of messages that can be spammed
require("noice").setup({
  lsp = {
    -- signature = {
    --   enabled = false,
    -- },
    -- override markdown rendering so that **cmp** and other plugins use **Treesitter**
    override = {
      ["vim.lsp.util.convert_input_to_markdown_lines"] = true,
      ["vim.lsp.util.stylize_markdown"] = true,
      ["cmp.entry.get_documentation"] = true, -- requires hrsh7th/nvim-cmp
    },
  },
  -- you can enable a preset for easier configuration
  presets = {
    bottom_search = true,         -- use a classic bottom cmdline for search
    command_palette = true,       -- position the cmdline and popupmenu together
    long_message_to_split = true, -- long messages will be sent to a split
    inc_rename = false,           -- enables an input dialog for inc-rename.nvim
    lsp_doc_border = false,       -- add a border to hover docs and signature help
  },

  -- Filter out yank messages, undo messages and write messages
  routes = {
    {
      filter = {
        any = {
          { event = "msg_show", kind = "", find = "yank" },
          { event = "msg_show", kind = "", find = "line less" },
          { event = "msg_show", kind = "", find = "fewer lines" },
          { event = "msg_show", kind = "", find = "more lines" },
          { event = "msg_show", kind = "", find = "<ed" },
          { event = "msg_show", kind = "", find = ">ed" },
          { event = "msg_show", kind = "", find = "written" },
        }
      },
      opts = { skip = true },
    },
  },
})
Miscellaneous
Venv Select
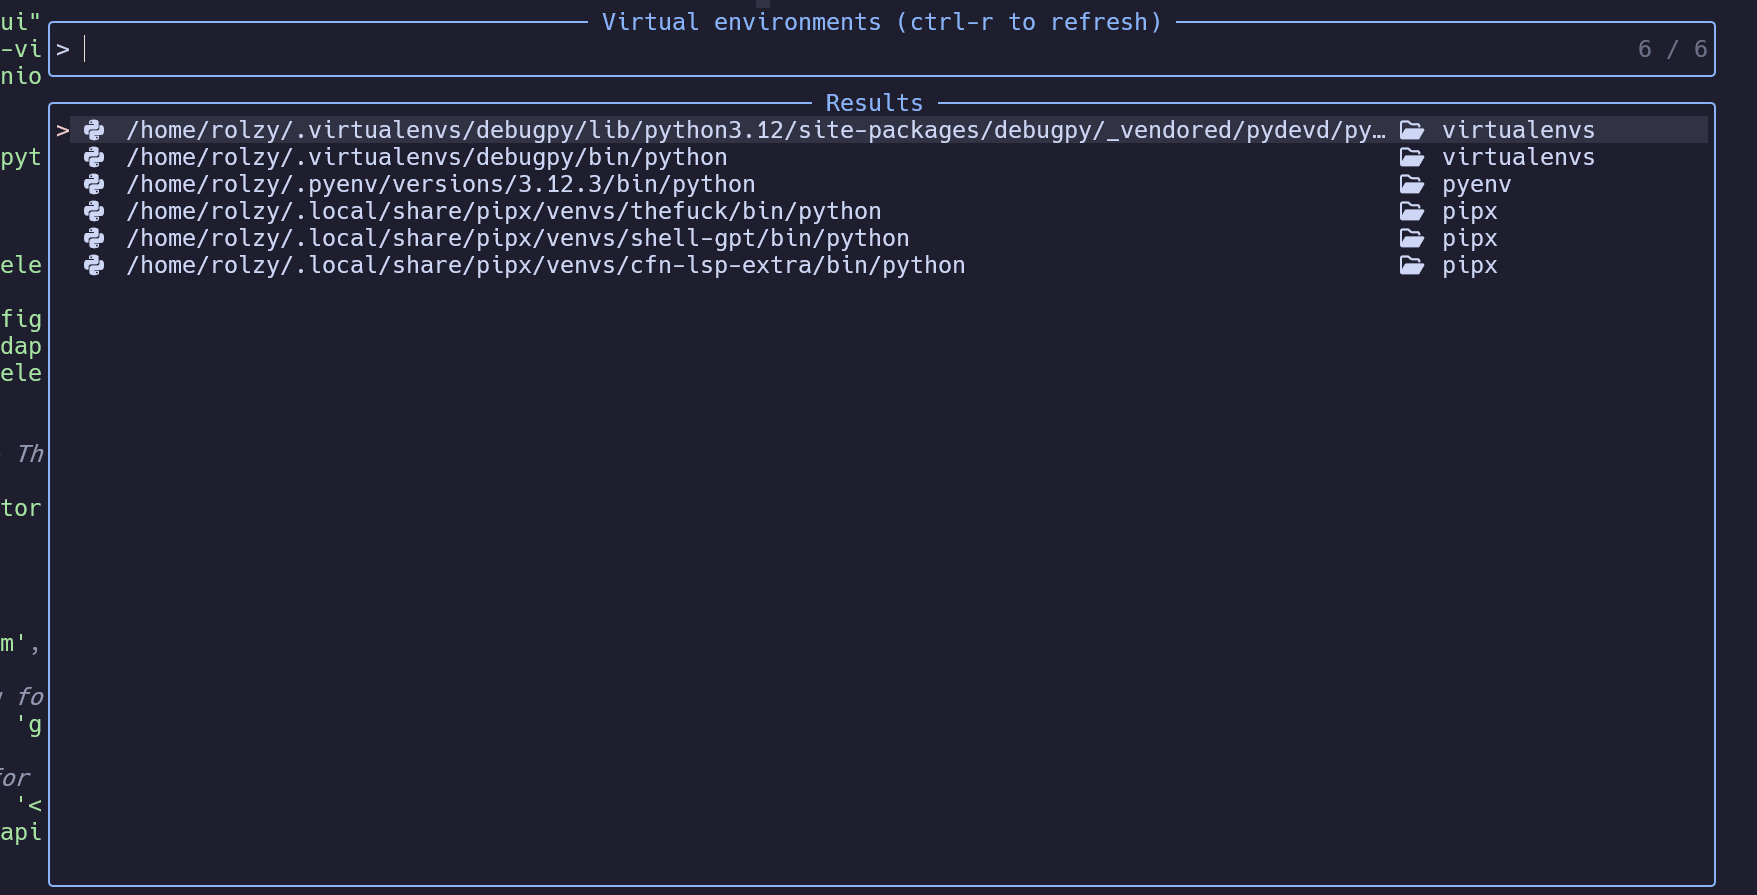
In order to get syntax highlighting and cmp, I need to make sure Neovim is loading my Python virtual environments. To do this, I used to have to activate the virtual environment and then open Neovim. linux-cultist/venv-selector.nvim is a neat plugin that will show all the available virtual environments, then switch them for you so that you don't have to exit from Neovim window.
Lastly
You can check the PR for my 2024 pimp up here: https://github.com/rolzy/dotfiles/pull/1


