Terraformを使って"AWS Lambdaとその取り巻き"を召喚しよう


はじめに
人生、いろんな「派閥」ってありますよね。私が属するITインフラ業界にも色々あります。どのクラウドを使うか、どのIDEを使うか、どのOSを使うか…枚挙に暇がありません。
インフラ(IaC)言語もその一つ。私はこの業界に足を踏み入れてから、ずっとCloudFormation派閥です。私はAWS専門だったので、AWS公式のCloudFormationで仕事が成り立ってました。
しかし最近、AzureやDatabricks関連の仕事も私に降ってくるようになりました。そうなると、AWS限定のCloudFormationでは対応できません。
そんなとき、複数のクラウドプラットフォームに対応できるTerraformという存在を耳にしました。
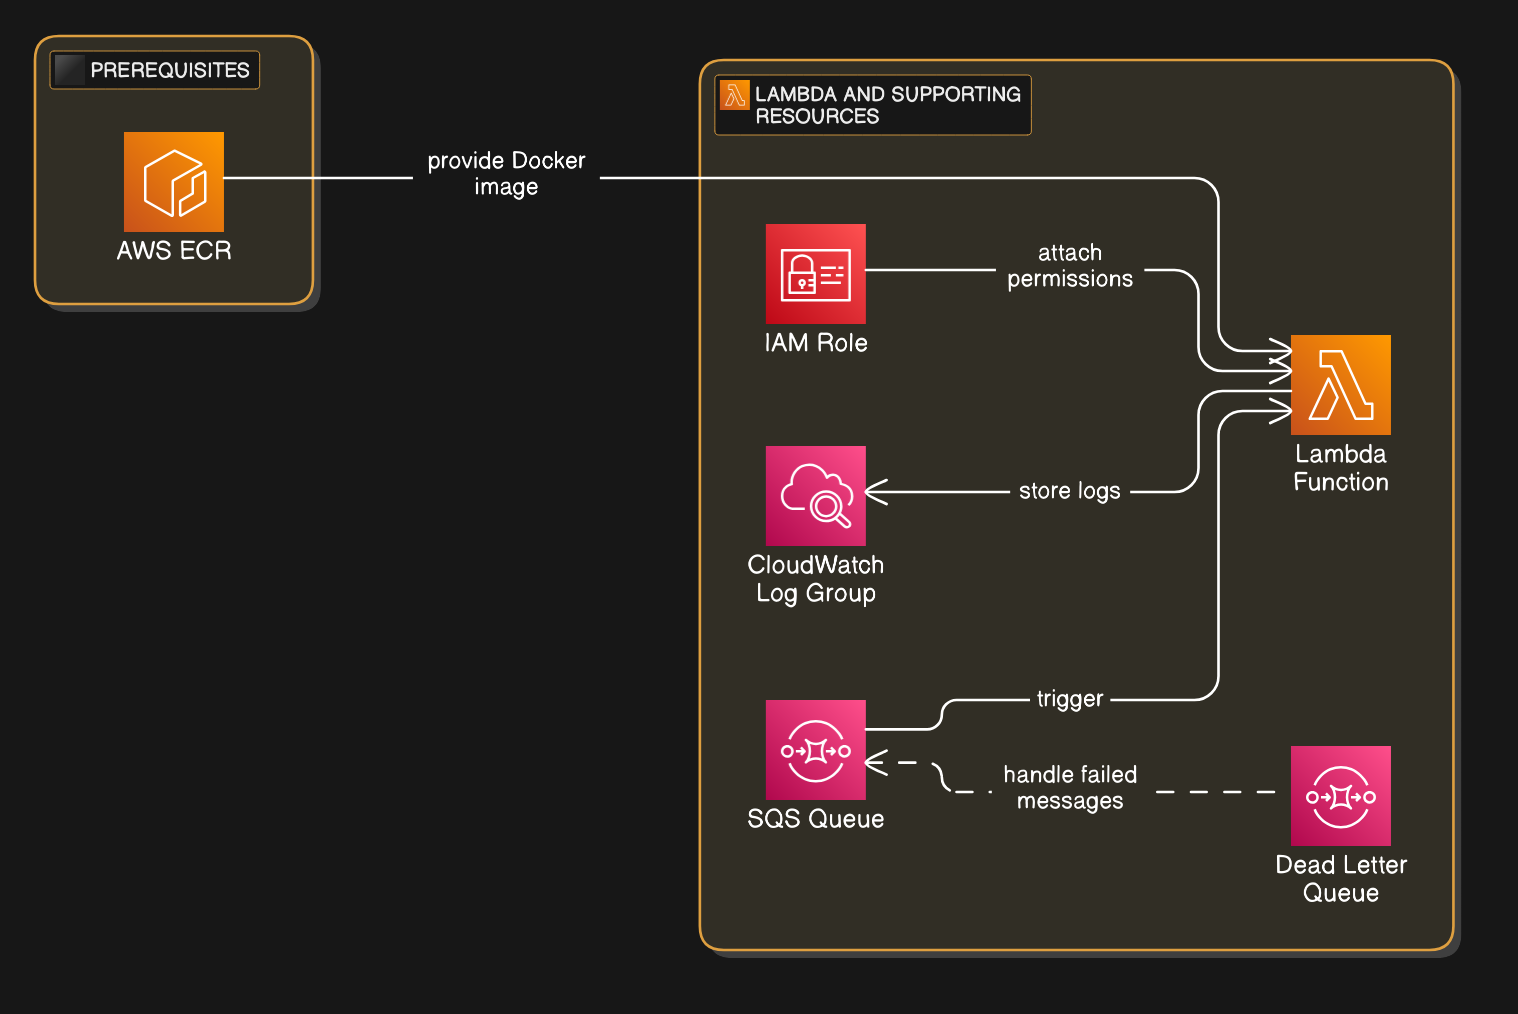
Terraformの練習として、AWS Lambdaとその取り巻き(ECR, IAM, Secrets Manager, CloudWatch, SQS) を召喚してみたので、この記事にまとめます。
環境構築
まずは公式マニュアルを参考にTerraformをインストールしましょう。
ターミナルからTerraformが動けば、インストール成功です。
rolzy $ terraform
Usage: terraform [global options] <subcommand> [args]

The available commands for execution are listed below.
The primary workflow commands are given first, followed by
less common or more advanced commands.
.
.
.
続いて、TerraformとAWSがやり取りできるようにしてあげましょう。必要なのは2つ。
Provider
Terraform Provider とは、Hashicorp社または各クラウド・SaaSサービスが提供する、Terraformとクラウドのインターフェースです。簡単に言うと、Terraformから各サービスを繋げる架け橋的な存在です。
Terraformが複数のクラウドプラットフォームに対応できるのは、色んなProviderが開発されてるおかげなんです。
公式ウェブサイトを見ると、実に4880個のProviderが利用可能とのこと!多すぎでしょ。
もちろん、AWS版も存在します。使うには、providers.tfというファイルに下記を書きましょう:
terraform {
  required_providers {
    aws = {
      source  = "hashicorp/aws"
      version = ">=5.78"
    }
  }

  required_version = ">= 1.2.0"
}

provider "aws" {
  region = "<任意リージョン>"
}
この段階でterraform initを動かすと、指定したProviderをインストールしてくれます。
rolzy ~ $ terraform init
Initializing the backend...
Initializing provider plugins...
- Finding hashicorp/aws versions matching ">= 5.78.0"...
- Installing hashicorp/aws v5.88.0...
- Installed hashicorp/aws v5.88.0 (signed by HashiCorp)
Terraform has created a lock file .terraform.lock.hcl to record the provider
.
.
.
AWSと認証
さて、Providerを使ってTerraformとAWSに架け橋を繋ぎました。繋いだはいいものの、橋の上には検問があります。
その検問とは、AWSの認証。AWSアカウントを認証しないと、AWSにリソースをデプロイできません。
AWS SSOなどを使って、認証情報をターミナルに読み込んでおきましょう。そうすれば、Terraformが検問を通れるようになります。
プログラムを用意する
続いて、Lambdaで動かすプログラムを用意しましょう。
プログラムを用意する方法はいくつかあります。プログラムをZIPしてアップロードしたり、Dockerイメージを作ったり、小さいプログラムならコンソールから直接書くこともできます。
私は断然Docker推しです。Dockerは仮想環境をまるごと作るので自分のプログラムにあった環境が作りやすいですし、そもそも業界標準ツールなので既に作ったDocker Imageを流用できる利点もあります。
以前はDockerイメージをLambdaで動かすと遅いという懸念材料があったのですが、現在は改善されてます。
公式マニュアルを参考にDockerイメージを作りましょう!
Dockerイメージのデプロイ
Dockerイメージができたら、AWS ECRというレポジトリサービスにアップロードしましょう。まずは、Terraformを使ってECRレポジトリを作ります。main.tfというファイルを作って下記を書きましょう:
resource "<リソースの種類>" "<任意の名前>" {<リソースのパラメーター}と書きます。
resource "aws_ecr_repository" "<Terraformでの名前>" {
  name         = "<AWSでの名前>"
}ファイルができたら、いよいよ初デプロイです。まずは、terraform planで変更点を確認しましょう。
rolzy ~ $ terraform plan

Terraform used the selected providers to generate the following execution plan. Resource actions are indicated with the following symbols:
  + create

Terraform will perform the following actions:

  # aws_ecr_repository.my_ecr_repo will be created
  + resource "aws_ecr_repository" "my_ecr_repo" {
      + arn                  = (known after apply)
      + id                   = (known after apply)
      + image_tag_mutability = "MUTABLE"
      + name                 = "my-ecr-repo"
      + registry_id          = (known after apply)
      + repository_url       = (known after apply)
      + tags_all             = (known after apply)
    }

Plan: 1 to add, 0 to change, 0 to destroy.

──────────────────────────────────────────────────────────────────────────────────────────────────────────────────────────────────────────────────────────────────────────────────────────────────────────────────

Note: You didn't use the -out option to save this plan, so Terraform can't guarantee to take exactly these actions if you run "terraform apply" now.
terraform planを動かすと、クラウド上で何が変更されるかひと目でわかるように教えてくれます。親切ですね。
問題なければ、terraform applyでクラウド上にECRレポジトリをデプロイします。途中、Do you want to perform these actions? (この変更を実行してもいいですか?) と確認してくるので yes と答えてあげましょう。
rolzy ~ $ terraform apply

Terraform used the selected providers to generate the following execution plan. Resource actions are indicated with the following symbols:
  + create

Terraform will perform the following actions:

  # aws_ecr_repository.my_ecr_repo will be created
  + resource "aws_ecr_repository" "my_ecr_repo" {
      + arn                  = (known after apply)
      + id                   = (known after apply)
      + image_tag_mutability = "MUTABLE"
      + name                 = "my-ecr-repo"
      + registry_id          = (known after apply)
      + repository_url       = (known after apply)
      + tags_all             = (known after apply)
    }

Plan: 1 to add, 0 to change, 0 to destroy.

Do you want to perform these actions?
  Terraform will perform the actions described above.
  Only 'yes' will be accepted to approve.

  Enter a value: yes

aws_ecr_repository.my_ecr_repo: Creating...
aws_ecr_repository.my_ecr_repo: Creation complete after 1s [id=my-ecr-repo]

Apply complete! Resources: 1 added, 0 changed, 0 destroyed.
成功です!AWSコンソールを覗いてみると、ちゃんとECRレポジトリが作られてます。

レポジトリのURIはコピーしておきましょう。この値を使って、さっき作ったDockerイメージをECRレポジトリにPushします。
# レポジトリに認証
aws ecr get-login-password --region ap-southeast-2 | docker login --username AWS --password-stdin <AWSアカウントID>.dkr.ecr.ap-southeast-2.amazonaws.com

# Dockerイメージをタグ付け
docker tag docker-image:test <ECRレポジトリUri>:latest

# DockerイメージをPush
docker push <ECRレポジトリUri>:latest
ECRレポジトリにイメージが出現すれば成功です。

Lambdaと愉快な仲間たち
あとはLambdaとその取り巻きを召喚するだけです!
まず、召喚時にパラメータを設定できるようにしましょう。variables.tfファイルを作り、中身に下記を書きましょう。
variable "image_uri" {
  description = "Image URI for the docker image"
  type        = string
}

variable "resource_prefix" {
  description = "Resource prefix for the module"
  type        = string
  default     = "my-terraform-deployment"
}こうしてvariableで定義されたブロックは、terraform apply時に変更できます。
今回、Dockerのimage_uriをパラメータにすることで、後にDockerイメージが更新された際に新しいタグを簡単に変更できるようになります。また、Lambdaと取り巻きの名前を一括管理するために、resource_prefixというパラメータも用意してます。
CloudWatch
CloudWatchは、aws_cloudwatch_log_group リソースを作ってあげればOKです。あとはLambdaが勝手に見つけてログを記録するようになります。
resource "aws_cloudwatch_log_group" "lambda_log_group" {
  name              = "/aws/lambda/${var.resource_prefix}-lambda-logs"
  retention_in_days = 14
}
SQS
先にaws_sqs_queueを使ってSQSキューとDeadletterキューを作っておきます。その後、aws_sqs_queue_redrive_allow_policyを使って2つのキューの関係を設定し、最後にaws_lambda_event_source_mappingでLambdaとSQSキューを紐付けします。
resource "aws_sqs_queue" "sqs_queue" {
  name                      = "${var.resource_prefix}-queue"
  message_retention_seconds = 86400
  redrive_policy = jsonencode({
    deadLetterTargetArn = aws_sqs_queue.sqs_deadletter_queue.arn
    maxReceiveCount     = 4
  })
}

resource "aws_sqs_queue" "sqs_deadletter_queue" {
  name = "${var.resource_prefix}-deadletter-queue"
}

resource "aws_sqs_queue_redrive_allow_policy" "terraform_queue_redrive_allow_policy" {
  queue_url = aws_sqs_queue.sqs_deadletter_queue.id

  redrive_allow_policy = jsonencode({
    redrivePermission = "byQueue",
    sourceQueueArns   = [aws_sqs_queue.sqs_queue.arn]
  })
}

resource "aws_lambda_event_source_mapping" "dealfinder_event_source_mapping" {
  event_source_arn = aws_sqs_queue.sqs_queue.arn
  enabled          = true
  function_name    = aws_lambda_function.lambda_function.arn
  batch_size       = 1
}
IAM
まずaws_iam_policy_documentを使ってIAM Policyの権限をJSONで設定します。その後、aws_iam_policyでPolicyを作成。続いて、aws_iam_roleでIAM Roleを作り、最後にaws_iam_role_policy_attachmentでRoleとPolicyを紐付けます。
data "aws_iam_policy_document" "lambda_role_trust_policy" {
  statement {
    effect = "Allow"

    principals {
      type        = "Service"
      identifiers = ["lambda.amazonaws.com"]
    }

    actions = ["sts:AssumeRole"]
  }
}

data "aws_iam_policy_document" "lambda_role_policy" {
  statement {
    effect = "Allow"
    actions = [
      "sqs:ReceiveMessage",
      "sqs:DeleteMessage",
      "sqs:GetQueueAttributes",
      "sqs:GetQueueUrl",
      "logs:CreateLogGroup",
      "logs:CreateLogStream",
      "logs:PutLogEvents",
    ]
    resources = [
      aws_sqs_queue.sqs_queue.arn,
      aws_sqs_queue.sqs_deadletter_queue.arn,
      aws_cloudwatch_log_group.lambda_log_group.arn,
    ]
  }
}

resource "aws_iam_policy" "lambda_role_policy" {
  name        = "${var.resource_prefix}-lambda-role-policy"
  description = "Policy for the lambda role"
  policy      = data.aws_iam_policy_document.lambda_role_policy.json
}

resource "aws_iam_role" "lambda_role" {
  name               = "${var.resource_prefix}-lambda-role"
  assume_role_policy = data.aws_iam_policy_document.lambda_role_trust_policy.json
}

resource "aws_iam_role_policy_attachment" "role_policy_attach" {
  role       = aws_iam_role.lambda_role.name
  policy_arn = aws_iam_policy.lambda_role_policy.arn
}
Lambda
最後!これまで作った取り巻きを融合させてLambdaを召喚します。
roleパラメータはIAMのlamda_roleimage_uriはECRにPushしたvar.image_urilambda_log_groupを先に作るようdepends_onで設定
resource "aws_lambda_function" "lambda_function" {
  function_name = var.resource_prefix
  description   = "My Lambda function"
  role          = aws_iam_role.lambda_role.arn
  package_type  = "Image"
  image_uri     = var.image_uri
  memory_size   = 256
  timeout       = 30

  depends_on = [
    aws_iam_role_policy_attachment.role_policy_attach,
    aws_cloudwatch_log_group.lambda_log_group,
  ]
}
召喚の儀
あとはterraform applyでLambdaをデプロイしましょう!
まず、var.image_uriの値を聞かれるので、URIをコピペしましょう。
rolzy ~ $ terraform apply
var.image_uri
  Image URI for the docker image

  Enter a value: XXXXX.dkr.ecr.ap-southeast-2.amazonaws.com/my-ecr-repo:latest

data.aws_iam_policy_document.lambda_role_trust_policy: Reading...
aws_ecr_repository.my_ecr_repo: Refreshing state... [id=my-ecr-repo]
data.aws_iam_policy_document.lambda_role_trust_policy: Read complete after 0s

Terraform used the selected providers to generate the following execution plan. Resource actions are indicated with the following symbols:
.
.
.
その後、問題なければ、Creation completeというログが出てきます。
.
.
.
aws_cloudwatch_log_group.lambda_log_group: Creating...
aws_iam_role.lambda_role: Creating...
aws_sqs_queue.sqs_deadletter_queue: Creating...
aws_cloudwatch_log_group.lambda_log_group: Creation complete after 0s [id=/aws/lambda/my-terraform-deployment-lambda-logs]
aws_iam_role.lambda_role: Creation complete after 2s [id=my-terraform-deployment-lambda-role]
aws_sqs_queue.sqs_deadletter_queue: Still creating... [10s elapsed]
aws_sqs_queue.sqs_deadletter_queue: Still creating... [20s elapsed]
aws_sqs_queue.sqs_deadletter_queue: Creation complete after 25s [id=https://sqs.ap-southeast-2.amazonaws.com/XXXXX/my-terraform-deployment-deadletter-queue]
aws_sqs_queue.sqs_queue: Creating...
aws_sqs_queue.sqs_queue: Still creating... [10s elapsed]
aws_sqs_queue.sqs_queue: Still creating... [20s elapsed]
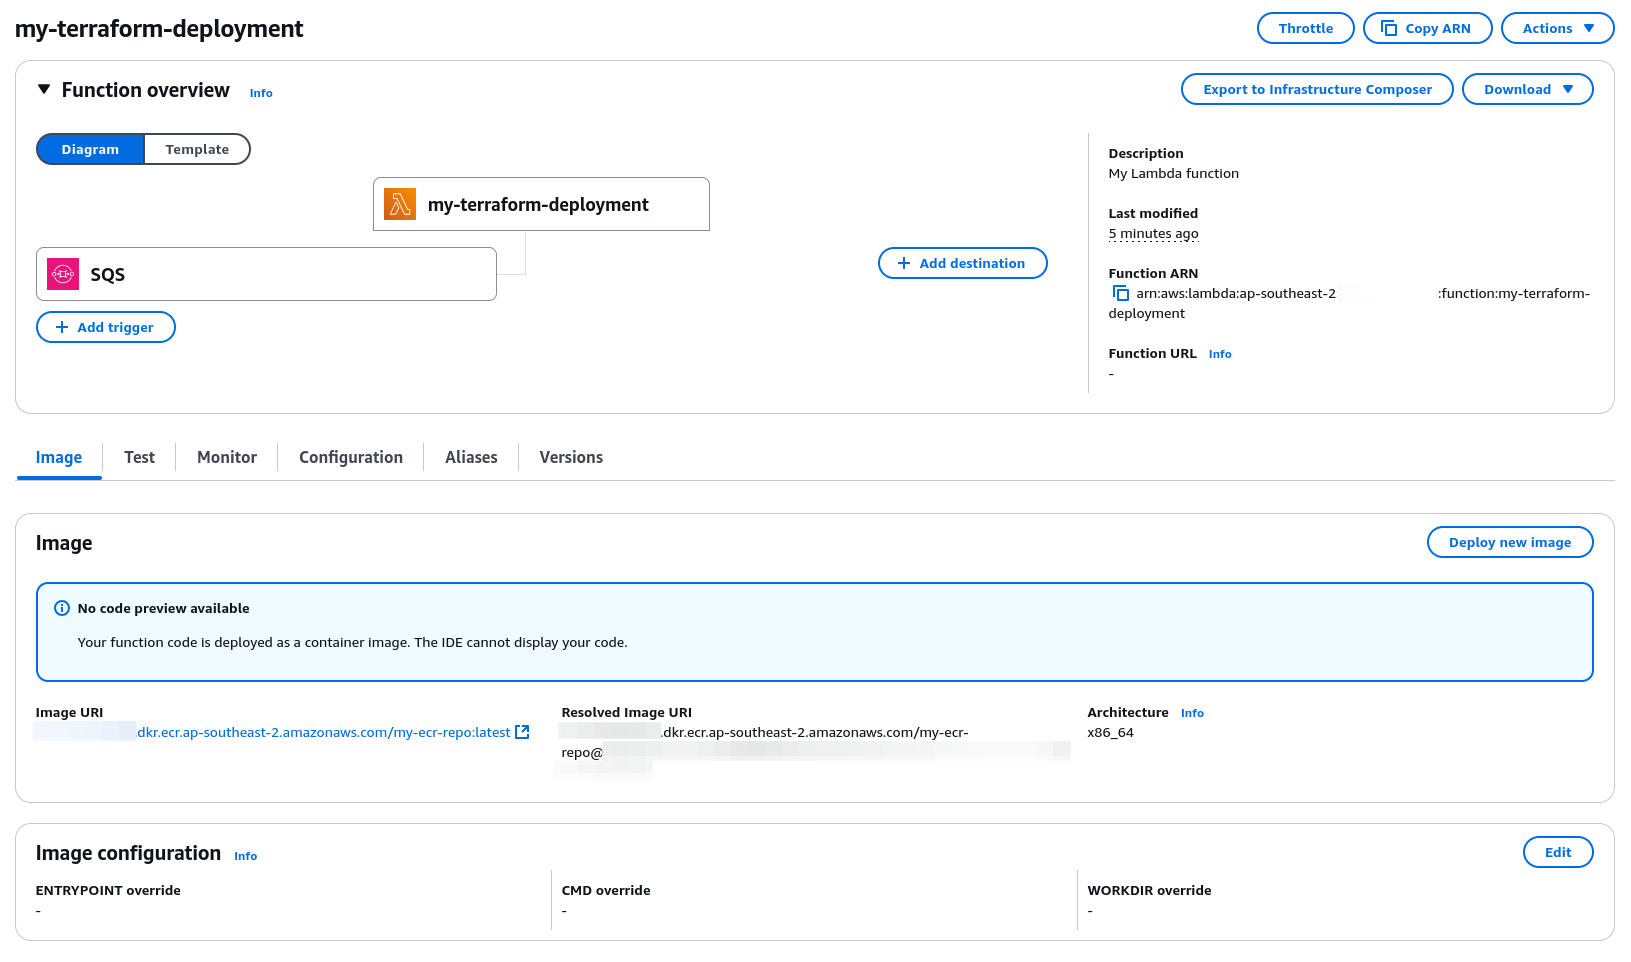
aws_sqs_queue.sqs_queue: Creation complete after 26s [id=https://sqs.ap-southeast-2.amazonaws.com/XXXXX/my-terraform-deployment-queue]コンソールを確認すると、SQSキューをトリガーにしたLambda functionが出来上がってます!召喚成功ですね!
最後に
今回作った仲間たちを削除したい方はterraform apply -destroyで幸せになれます。


